Homeowners: Add Stairs to Decks Over 30 Inches Without Failing Inspection
A practical, code-aware walkthrough for homeowners: measure total rise, use a story pole and pattern stringer, avoid permit delays, or hire a pro to...
Homeowners: Add Stairs to Decks Over 30 Inches Without Failing Inspection
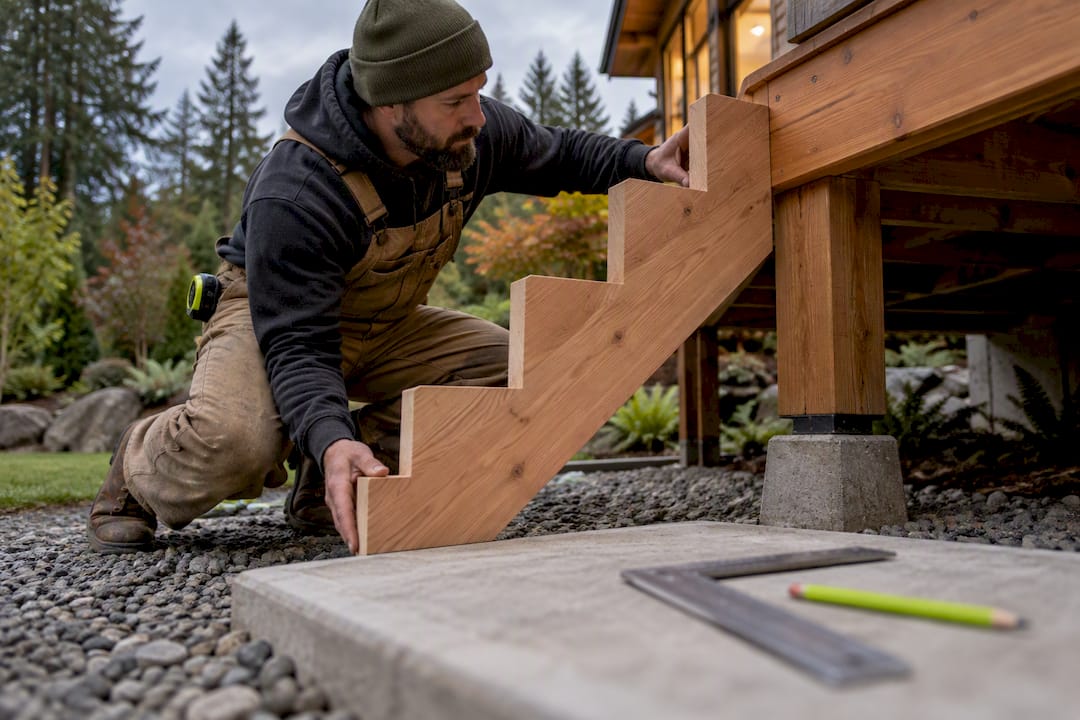
Yes, you can add stairs to most existing decks, and the framing under your feet is usually up to the job. The first move is not buying lumber. It’s measuring your total rise and calling your local building department, since that single number, checked against IRC stair limits for rise and run, determines almost every decision that follows. A story pole and a framing square assist with the layout work.
TL;DR:
Most jurisdictions require a permit if deck stairs access a surface higher than 30 inches above grade, especially if guardrails or structural changes are involved.
The maximum riser height is 7 3/4 inches, with a minimum tread depth of about 10 inches, and these must be consistent within a flight to prevent safety hazards.
Accurate measurement of total rise and testing a single pattern stringer before cutting the rest are crucial steps to ensure code compliance and stair safety.
Pressure-treated 2x12 lumber is the standard material for stringers, with stainless steel hardware recommended for durability and security in weather-exposed environments.
DIY construction is suitable for simple, accessible settings under 30 inches height, but larger or more complex stairs benefit from professional installation to avoid safety and code issues.
CactusdeckingBuild Safer, Inspection-Ready Deck StairsCactus Decking creates custom outdoor spaces with safe, stylish deck construction and a clear process from consultation through construction.Explore deck services
Table of Contents
How Do You Add Stairs to an Existing Deck the Right Way?
How Do You Measure Total Rise and Calculate Stair Risers?
What Materials and Tools Do You Need to Build Deck Stairs?
How Do You Lay Out and Cut Stair Stringers?
How Do You Attach Stringers to a Deck Securely?
What Are the Landing Pad and Footing Requirements for Deck Stairs?
How Do You Install Treads, Risers, and a Code-Compliant Handrail?
Why Do DIY Deck Stairs Fail Inspection or Feel Unstable?
When Should You Hire a Pro for Deck Stairs?
What Homeowners Get Wrong About Deck Stairs
Get Professional Deck Stairs Built Right the First Time
Sources
How Do You Add Stairs to an Existing Deck the Right Way?
Before anything gets cut, you need to know two things: whether your project needs a permit, and what dimensions the code demands once you have one. Skip this step and you risk a failed inspection, a stair that trips people, or worse, a connection that lets go under load.
Most jurisdictions require a permit for deck stairs when the deck sits more than 30 inches above grade, since that height threshold typically triggers guardrail requirements too. Some cities require a permit for any exterior stair regardless of height, especially if it changes the structure’s load path or attaches to a ledger. A five-minute call to your building department, or a look at their online permit matrix, saves you from tearing out work later.
The dimensional rules themselves come from the International Residential Code, and most local codes mirror them closely:
Maximum riser height: 7 3/4 inches, with no more than 3/8 inch variance between the tallest and shortest riser in a flight.
Minimum tread depth (unit run): about 10 inches, measured from nosing to nosing.
Minimum stair width: 36 inches, clear of handrails.
Landing requirement: a landing at least as wide as the stair and 36 inches deep at both the top and bottom of the run.
Headroom: at least 6 feet 8 inches where the stair passes under any overhead structure.
Local amendments can tighten these numbers. Some cold-climate municipalities require footings below the frost line even for a small landing pad, and a few coastal jurisdictions add wind-load provisions for open stringers. Never assume your neighbor’s stair design meets your city’s code just because it looks similar.
Before you contact a contractor or a permit desk, gather these measurements:
Total rise from the deck surface to the finished grade below.
Available run space (how far the stair can extend from the deck before hitting a walkway, planting bed, or property line).
Deck height above grade, to confirm whether guardrails are required.
Rim joist or framing thickness where stringers will attach.
Ground slope at the base of the stairs.
Pro Tip: Take a photo of your deck framing from underneath before you call an inspector or contractor. Most permit reviewers and estimators can answer half their questions from a single clear picture of the rim joist and any existing blocking.
How Do You Measure Total Rise and Calculate Stair Risers?
Total rise is the vertical distance from the top of the decking to the landing surface below, and getting this number wrong throws off every cut that follows. Measure straight down with a level and a tape, not along a slope, and include the thickness of the decking boards themselves. If your deck sits on uneven ground, measure to the lowest point where the stair will land, then account for grading separately.
Professional builders often call this step “engineering,” not carpentry, and that’s not an exaggeration. A half-inch measurement error spread across a flight of stairs creates a trip hazard that most people won’t consciously notice until they stumble on it.
Once you have total rise, a story pole makes the math almost foolproof. Cut a straight piece of scrap lumber long enough to reach from the ground to the deck surface, hold it plumb at the spot where the stairs will land, and mark the deck height on it. Then divide that mark into equal segments no taller than 7 3/4 inches. Whatever number of segments you land on is your riser count.
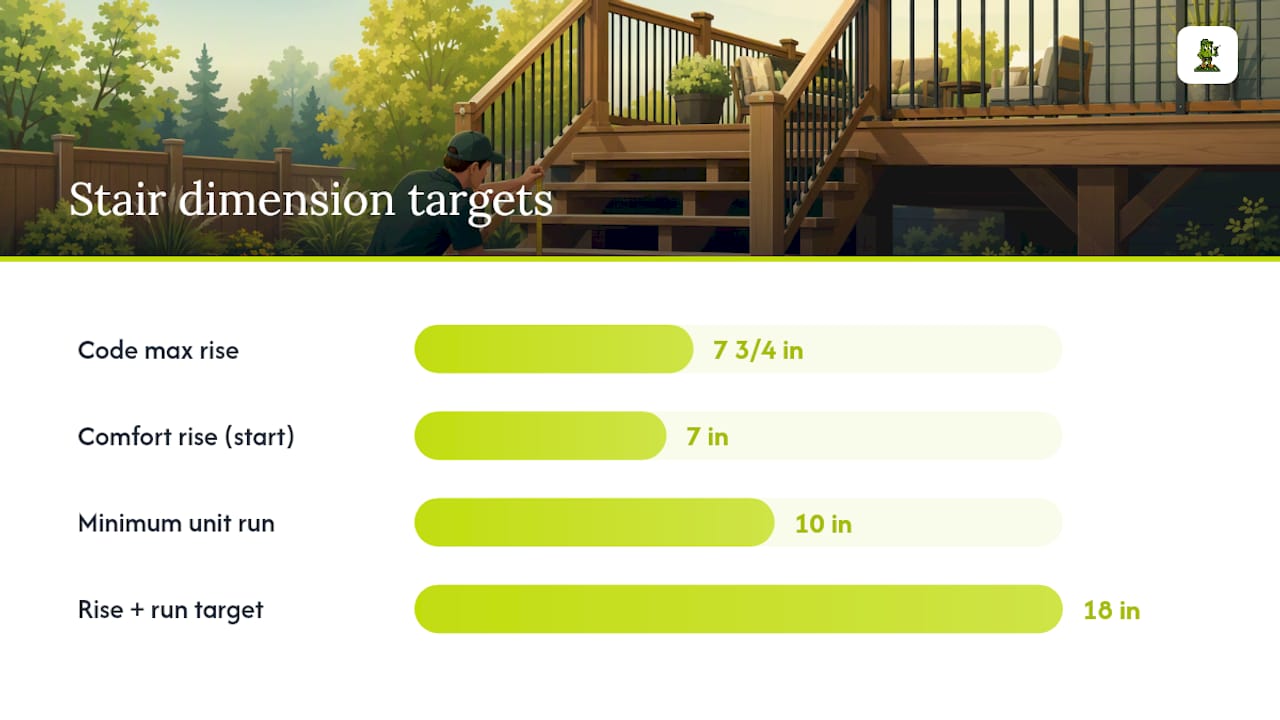
Statistic Callout: Code caps unit rise at 7 3/4 inches and sets minimum unit run at about 10 inches. Many experienced builders aim for a “rise plus run” total near 18 inches, since that ratio matches natural walking stride and feels comfortable underfoot.
Here’s the calculation sequence in order:
Measure total rise (in inches) from decking surface to finished grade.
Divide total rise by a target unit rise (start with 7 inches as a comfortable estimate) and round to the nearest whole number. That’s your riser count.
Divide total rise by the riser count to get your actual unit rise. Confirm it’s 7 3/4 inches or less.
Subtract one from the riser count to get your tread count, since the top step is the deck surface itself.
Choose a unit run (10 inches minimum) and multiply by the tread count to get total run, the horizontal footprint of the stairs.
Calculate stringer length using the Pythagorean theorem: stringer length equals the square root of (total rise squared plus total run squared). Add 12 inches or more for the tail cut and top attachment.
Write these numbers down in a simple table before you touch a saw. A lumber yard employee or a building inspector can sanity check your numbers in seconds if they’re organized this way.
If your available run is tight, a switchback design can fit the same rise into less footprint, though it adds a landing platform and more framing complexity. It’s worth exploring switchback stair layouts if your yard doesn’t give you a straight shot down from the deck.
A stair calculator can cross-check your hand math in seconds and is worth running even if you’re confident in your numbers. Cheap insurance against an expensive mistake.
What Materials and Tools Do You Need to Build Deck Stairs?
Stringers are the structural backbone of any stair, and pressure-treated 2x12 lumber is the standard choice because it gives you enough width to cut deep triangular notches without weakening the board past code minimums. Don’t substitute a narrower board to save money here. A 2x10 stringer with deep step notches can leave less than 3.5 inches of solid wood at the weakest point, which is not enough for a residential stair carrying foot traffic.
For treads, you can run two 2x6 boards per step (spaced for drainage) or use pre-cut composite treads sized to match your decking. If your deck itself is composite, matching tread material keeps the look consistent and avoids mixing expansion rates between wood and composite parts. Risers are optional structurally on open stringers, but closed risers improve appearance and keep debris from collecting under the stairs.
Hardware quality matters more here than almost anywhere else on the deck. Buried, hidden connections are where most structural failures start, and stair hardware takes constant flexing from foot traffic plus direct weather exposure. Stainless steel or hot-dip galvanized connectors resist corrosion far better than standard zinc-coated hardware, especially in wet or coastal climates.
Your shopping list should include:
Pressure-treated 2x12 lumber for stringers (one per 16 inches of stair width, minimum three for a standard 36 inch stair).
Stair angle brackets or stringer connector hardware rated for exterior use.
Structural screws (not deck screws) for stringer-to-ledger and stringer-to-pad connections.
Self-tapping concrete screws or wedge anchors if attaching to an existing concrete pad.
2,500+ psi concrete mix if you’re pouring a new landing pad.
Galvanized or stainless joist hangers if a hangerboard is needed.
On the tool side, a framing square and a story pole handle the layout. A circular saw with a fresh blade makes the stringer cuts, and a jigsaw finishes the inside corners of each notch, since a circular saw alone will overcut past the line. A four-foot level, a socket driver for lag screws, and a post-hole digger or auger round out the essentials.
Pro Tip: Buy one extra stringer board even if your math says you only need three. If you make a layout mistake on the pattern stringer, you’ll want a fresh board on hand rather than a trip back to the lumber yard mid-project.
Stringer brackets that let you skip cutting deep notches entirely are worth considering if your saw skills are rusty. They sit on top of a straight 2x12 and hold pre-cut tread ledgers in place, trading some material cost for a much simpler cut list.
How Do You Lay Out and Cut Stair Stringers?
Cut one stringer first, test it against the actual stair opening, and only then cut the rest. This single habit, standard among professional stair builders, catches layout errors before they multiply across three or four boards instead of one.
Here’s the layout sequence:
Lay the 2x12 flat and clamp a framing square to it, set to your calculated unit rise on one leg and unit run on the other.
Trace the first step outline using the square as a guide, then slide the square down the board and repeat for each subsequent riser and tread.
Mark the top cut (where the stringer meets the deck framing) and the bottom cut (where it meets the landing) separately, accounting for the thickness of the tread that sits on top of the bottom step.
Cut the notches with a circular saw, stopping just short of the inside corner, then finish each corner cut with a jigsaw to avoid weakening the board with an overcut.
Test-fit the pattern stringer against the deck and the landing pad before cutting anything else.
Trace the pattern stringer onto the remaining boards and repeat the cuts.
Overcutting past the notch line is the most common mistake, and it’s not cosmetic. Every cut that runs past the intended corner removes wood from the narrowest, highest-stress part of the board. Builders who’ve cut hundreds of stringers save the top offcut piece specifically to scribe plumb and level lines on later stringers, which keeps every board in the flight identical.
Typically, three stringers spaced about 16 inches apart are used for a standard 36-inch wide stair, matching joist spacing. Wider stairs or those using composite treads may require more stringers, spaced closer, based on manufacturer recommendations to prevent sagging.
Test-fitting isn’t optional even after your pattern stringer works. Hold the finished stringer in position, check that the top and bottom cuts sit flush, and confirm the tread lines are level side to side before you commit to fastening anything.
How Do You Attach Stringers to a Deck Securely?
The connection between your stringers and the existing deck frame carries every bit of load the stairs will ever see, and it’s the single spot where DIY stair projects most often go wrong. If your stair’s top tread lines up with the deck’s rim joist, you can often attach stringers directly to it. But if the top step sits below the decking surface, as it does on most designs, you need a hangerboard fastened to the rim joist to give the stringers a proper nailing surface instead of relying on thin rim material alone.
Key attachment guidelines:
Use galvanized or stainless angle brackets rated for structural connections, not general-purpose corner braces.
Fasten stringers to the hangerboard or rim joist with structural screws or through-bolts, never with standard deck screws alone.
Add blocking behind the rim joist if the existing framing doesn’t give you solid wood to fasten into at every stringer location.
Secure the bottom of each stringer to the landing pad with a post base or stringer anchor rated for exterior use.
Never notch or cut into a load-bearing deck post to make room for a stringer. Reroute the stair location instead.
Before final fastening, brace each stringer temporarily with a diagonal scrap board and a clamp, then check for square using a speed square at the top and a level across all three stringers. It takes ten extra minutes and it’s the difference between stairs that feel solid and stairs that rack side to side under a heavy step. Once everything checks out level and square, drive your final fasteners starting at the top connection and working down to the landing.
If you’re unsure whether your rim joist can handle the added point loads from a hangerboard, that’s a legitimate moment to bring in a contractor for a quick structural check rather than guessing.
What Are the Landing Pad and Footing Requirements for Deck Stairs?
A landing pad gives the bottom of your stairs a stable, code-compliant surface to rest on, and skipping it or undersizing it is one of the fastest ways to fail an inspection. Codes generally call for a minimum landing pad of about 36 by 36 inches, sized to match or exceed your stair width. Wider stairs need a proportionally wider pad.
For the concrete itself, aim for a mix rated at 2,500 psi or higher, which is standard for exterior slabs and footings. Form the pad with 2x4 lumber staked into place, level the form before pouring, and slope the surface slightly away from the house for drainage. A pad that traps water against the bottom of your stringers will rot pressure-treated lumber years ahead of schedule despite the treatment.
Frost depth is the wildcard that trips up a lot of DIY landing pads. In regions with real winter freeze, a simple surface pad can heave over a few seasons if it’s not tied into a footing that extends below the frost line, which your local building department can tell you exactly in inches. Some jurisdictions let a floating landing pad slide without a deep footing since it’s not attached to the house structure. Others require piers regardless. This is exactly the kind of local amendment that makes a permit desk call worthwhile before you pour anything.
Minimum pad size: 36 inches by 36 inches, or match your stair width if wider.
Concrete strength: 2,500 psi minimum for exterior use.
Anchor stringers or posts to the pad with post bases rated for wet, direct-bearing exterior conditions.
Slope the pad slightly away from the house to shed water.
Check frost depth requirements with your building department before deciding between a surface pad and a footing.
Pro Tip: Pour your landing pad a few inches larger than code minimum if you have the room. A slightly oversized pad gives you room for error when the stringers land, and it looks intentional rather than cramped once the stairs are finished.
How Do You Install Treads, Risers, and a Code-Compliant Handrail?
With stringers attached and the landing cured, the finishing steps determine whether your stairs feel solid underfoot or bouncy and unfinished. Install risers first if you’re using them, fastening them to the front face of each stringer notch before the treads go on top. Closed risers look cleaner and keep leaves and debris from collecting in the stair cavity, while open stringers without risers are simpler and cheaper but show more of the structure underneath.
Treads go on next, and this is where tread overhang, or nosing, matters more than most first-time builders expect. A nosing of 3/4 to 1 1/4 inches beyond the riser face is standard and makes the stair easier to descend safely, since it gives your foot a slightly larger landing target on each step. Fasten treads with two screws per stringer at minimum, and if you’re using composite decking, leave the manufacturer’s specified expansion gap between boards since composite material expands and contracts more than wood across temperature swings.
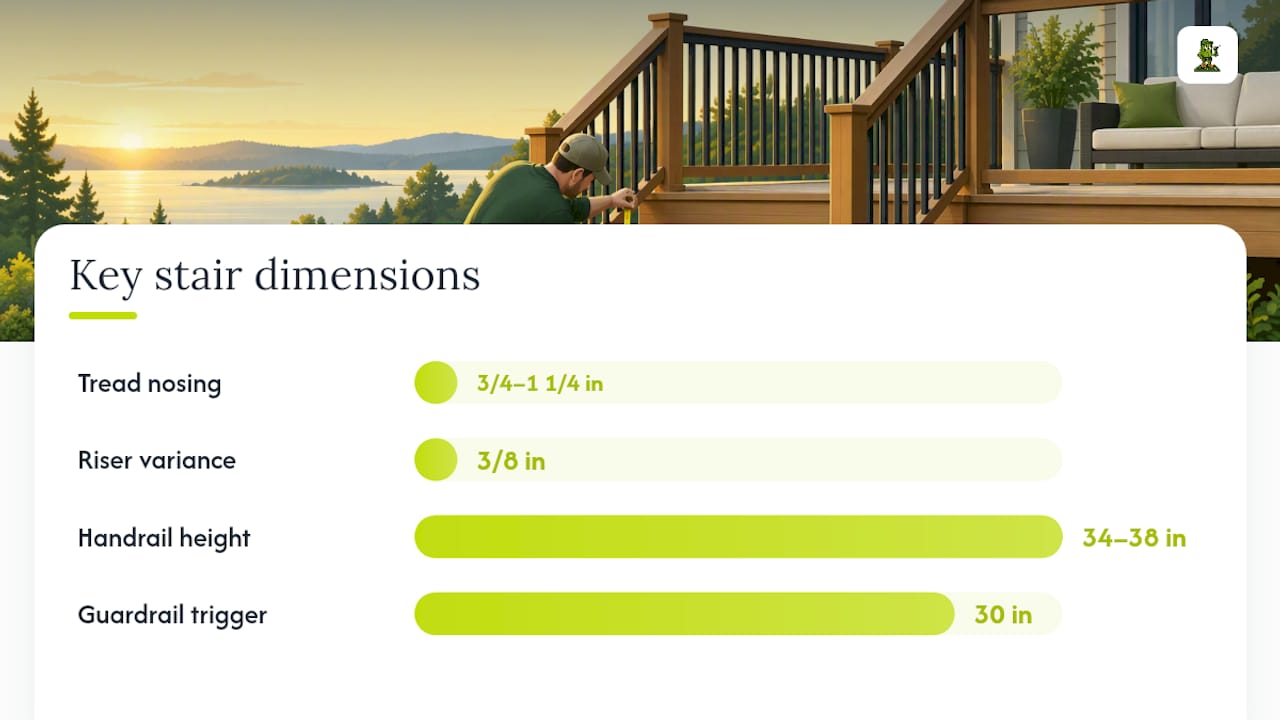
Handrails come next, and the rules here are non-negotiable in most jurisdictions. A graspable handrail is generally required on any stair with four or more risers, mounted between 34 and 38 inches above the nosing line, with a profile your hand can actually wrap around, not a flat 2x4 cap rail. Statistic Callout: Guardrails become mandatory once the deck surface sits more than 30 inches above grade, a threshold pulled directly from IRC guardrail provisions that most local codes adopt without modification. If your deck clears that height, the stairs themselves also need guardrails along any open side, not just a handrail on the climbing side.
Before you call the project finished:
Check every riser height with a tape measure. Variance greater than 3/8 inch between the tallest and shortest step fails inspection and creates a genuine trip hazard.
Confirm handrail height falls between 34 and 38 inches and that it’s continuous from top to bottom.
Verify tread fasteners are snug with no movement when you step on each board.
Inspect the ledger or hangerboard connection one more time for gaps or loose fasteners.
Review deck railing height requirements if your deck height puts you in guardrail territory, since the same graspability and baluster spacing rules apply to stair-side railings as they do to the main deck perimeter. For design choices on rail style, a look at current deck railing ideas can help you match the stair rail to the rest of the structure rather than bolting on something that looks like an afterthought.
Why Do DIY Deck Stairs Fail Inspection or Feel Unstable?
Most stair problems trace back to one of three things: inconsistent riser heights, weak or hidden connections, or an overcut stringer that nobody caught before installation. Catching these early costs you an hour. Catching them after the deck is finished can cost you a full rebuild of the flight.
Start your diagnostic check with a tape measure, not a visual inspection. Measure every single riser height in the flight and compare them. A variance beyond 3/8 inch between the tallest and shortest step is both a code failure and a genuine safety issue, since your foot expects a consistent rhythm going down stairs and a single mismatched riser is a common cause of falls.
Next, check every load-bearing connection by hand. Grab each stringer near the top and try to rock it side to side and front to back. Any movement points to a loose fastener, a missing hangerboard, or blocking that was never added behind the rim joist. Hidden connection failures cause more structural problems than any material choice, which is exactly why the fastening step deserves more attention than the tread selection.
Common fixes for what you find:
Riser variance: usually means one stringer was cut differently than the others. Compare it to your pattern stringer and recut if the error is beyond 1/4 inch.
Loose stringer connections: add a sistered support board alongside the existing stringer, or install additional blocking behind the attachment point.
Overcut or weakened stringer: replace it entirely rather than trying to reinforce a compromised notch. A sistered 2x4 alongside an overcut area does not restore full strength.
Wobbly handrail posts: add blocking between the stringer and the post, since a post bolted only through thin decking will loosen over time.
If you find signs of rot in the existing deck framing, if your rim joist seems undersized for the added stair load, or if the permit office asks for an engineer’s stamp, that’s the point to stop and call a contractor. Structural uncertainty is not a place to guess.
Before you call the project done, run through this final list: every riser within 3/8 inch of the others, every connection tight with no rock or flex, handrail height and graspability correct, and the landing pad showing no cracking or settling.
When Should You Hire a Pro for Deck Stairs?
DIY stair building works well for straightforward runs on solid, accessible framing where you’re comfortable with a circular saw and a framing square. It stops being the right call when the deck height pushes past 30 inches, when your rim joist needs reinforcement you’re not sure how to size, or when the permit office wants an engineered plan before they’ll sign off.
That’s the gap a licensed local contractor fills. Cactus Decking builds deck stairs as part of its full deck construction and replacement services around Everett, using an in-house build crew rather than subcontractors, which keeps quality consistent from the first measurement to the final railing. Every installation is warranty-backed, and the company works with composite, PVC, and cedar materials suited to Pacific Northwest weather, including eco-conscious options for homeowners who want that choice.
Reasonable criteria for bringing in a professional:
Your deck height requires guardrails and you’re not confident sizing the connections yourself.
The permit office is asking for engineered drawings or structural calculations.
You’ve found rot, undersized framing, or other issues in the existing deck during your inspection.
You want a custom design, like a switchback stair or an integrated landing platform, that goes beyond a straight run.
You’d rather spend a weekend enjoying the deck than building the stairs to it.
A reputable contractor should walk you through the same code checks and measurements covered here, not skip past them because you’re paying for the work.
What Homeowners Get Wrong About Deck Stairs
The conventional advice on deck stairs spends most of its energy on the visible parts: tread material, railing style, how the finished stair looks from the yard. That’s backwards. The stuff that actually causes failures, inconsistent riser heights and weak hidden connections, sits underneath everything you can see, and it’s exactly what a rushed DIY job skims past.
If I had to pick one habit that separates a stair that lasts twenty years from one that gets rebuilt in five, it’s the pattern stringer test-fit. Skipping it to save twenty minutes is the single most common shortcut I’d flag, because every error in that first stringer gets copied onto every board that follows it.
The other place people cut corners is hardware. Standard deck screws where a structural screw belongs, or a general corner brace where a rated stair bracket belongs, save maybe ten dollars and risk everything above them. Spend the extra money there before anywhere else on the project.
— Vlad
Get Professional Deck Stairs Built Right the First Time
If the measuring, cutting, and code checking above feels like more than you want to take on this weekend, that instinct is worth listening to. Custom stairs can be built and installed as part of full deck projects by a local in-house crew that manages permitting, structural connections, and finish work without subcontracting.

That in-house approach matters most exactly where DIY stairs tend to go wrong, at the hidden connections and the code-compliant handrail details that don’t show up until an inspector or a guest catches them. Installations may be warranty-backed, and customers can select composite, PVC, or cedar materials suitable for Northwest weather. If your project is bigger than just the stairs, deck installation and deck design services cover the rest of the structure too. Request a consultation through the deck stairs page and get a plan built around your actual deck height, yard slope, and code requirements, not a generic estimate.
Sources
FAQ
How Much Does It Cost to Add Stairs to an Existing Deck?
Cost depends heavily on stair height, material choice, and whether a new landing pad is needed, but a commonly cited ballpark runs $150 to $320 per step for materials and labor combined. A tall stair with a required landing and guardrails will land at the higher end of that range or beyond it. For an exact number on your project, Cactus Decking’s deck stairs page is the place to request current pricing.
What Is the 7 3/4 Rule for Stairs?
The rule refers to the maximum riser height allowed under most residential building codes: no single step can rise more than 7 3/4 inches. It exists because a taller riser changes your walking stride enough to become a fall hazard, especially on stairs used daily.
What Is the Cheapest Way to Build Outdoor Stairs?
Skipping a poured concrete landing in favor of a compacted gravel base can also cut costs where local code allows it, though a proper landing pad is usually worth the extra expense for long-term stability.
Is It Hard to Build Deck Stairs?
The cuts themselves are straightforward with a circular saw and a framing square, but the math and code compliance trip up a lot of first-time builders. Getting total rise, riser count, and unit run correct before cutting anything is the part that takes real care, which is why professionals cut one pattern stringer and test-fit it before committing to the rest of the flight.
Do I Need a Permit to Add Stairs to My Deck?
In most areas, yes, especially if your deck sits more than 30 inches above grade or if the stairs attach to the home’s structure. Requirements vary by city, so a quick call to your local building department, or a review of a general code compliance guide, will tell you exactly what’s required before you start cutting lumber.