How to Build an Outdoor Kitchen on Your Deck
Transform your deck into a stunning outdoor kitchen by ensuring it can bear the weight, meets fire codes, and is properly outfitted.

How to Build an Outdoor Kitchen on Your Deck
Yes, you can build an outdoor kitchen on a deck — but only if the structure can handle the weight, the layout meets fire-code clearances, and utilities are properly routed. Those three conditions are the whole ballgame. Skip any one of them and you’re looking at a structural failure, a code violation, or a fire hazard.
The single most important requirement is load capacity. Make It Right® notes that many residential decks are designed for a moderate weight load, and an outdoor kitchen introduces concentrated loads from stone countertops, built-in appliances, and masonry framing that can easily exceed that baseline in specific zones. A built-in grill alone can weigh 150–300 lbs. Add a stone countertop and a refrigerator, and you’re stacking several hundred pounds onto a few square feet of deck framing.
Before you order a single appliance, run through these three checks:
Structural capacity: Have a licensed contractor or structural engineer verify your deck’s load rating and inspect footings, joists, and the ledger board.
Permits and fire-code clearances: Contact your local building department. Most jurisdictions require permits for gas lines, electrical work, and structural modifications. HOA rules may add restrictions on top of code.
Utility access: Confirm where gas, electrical, and water lines can be routed to the deck without violating code or creating drainage problems.
Pro Tip: Before calling a contractor, pull out whatever paperwork you have on your deck: original plans, permit records, or the builder’s spec sheet. Even rough notes on post spacing and joist size help a pro give you a faster, more accurate assessment.
The immediate next step is a structural check. Schedule a site visit with a licensed contractor or call your local building department to ask about permit requirements in your jurisdiction. Cactusdecking offers consultations that cover exactly this sequence, from load assessment to design.
Key Takeaways
Building an outdoor kitchen on a deck is achievable for most homeowners, but structural verification, non-combustible materials, and permitted utility work are the three requirements that determine whether the project succeeds or fails.
Point | Details |
|---|---|
Verify load capacity first | Most residential decks are designed for ~50 PSF; concentrated kitchen loads often require a professional structural assessment. |
Use non-combustible grill surrounds | Insulated grill jackets and cement board framing protect deck substructure from long-term heat damage even when clearances are met. |
Route utilities with licensed trades | Gas lines, dedicated electrical circuits, and sink drains all trigger permits and require licensed contractors in most U.S. jurisdictions. |
Choose lightweight materials | Porcelain countertops, composite decking (Trex, Fiberon), and polymer cabinetry reduce structural demands compared with masonry-heavy builds. |
Cactusdecking for Everett-area builds | Cactusdecking handles structural assessment, permitting, and warranty-backed installation for deck kitchen projects in Everett, WA. |
Table of Contents
What outdoor kitchen layouts actually work on a deck?
Is your deck strong enough? A load-capacity checklist
What a professional deck-readiness inspection actually covers
Which materials hold up best for a deck-mounted outdoor kitchen?
Grill and fire safety: what you need to know before you cook
Running gas, electrical, and plumbing to your deck kitchen
Protecting your deck from water and grease damage
Circulation and clearance: how much space does a deck kitchen need?
What does an outdoor kitchen on a deck actually cost?
When should you hire a licensed contractor?
Why decks are actually the best place for an outdoor kitchen
Cactusdecking builds deck kitchens that are ready for the long haul
Sources
What outdoor kitchen layouts actually work on a deck?
Layout choice is where most homeowners either get it right or waste money. The good news: Trex RainEscape reports that most outdoor kitchens fit within a modest to mid-sized footprint, and a functional setup can work in a relatively small space with a grill and a prep counter.
Three layout families cover most deck scenarios:
Straight-line (single run): One continuous run of cabinetry, countertop, and grill along a single wall or railing. Works best on narrow decks or as a first phase of a larger build. An 8x10 or 10x12 footprint handles this comfortably with a grill, two feet of prep space, and a small side burner.
L-shape: Two runs meeting at a corner. This is the most versatile layout for decks in the 12x16 range. You get a natural separation between the hot cooking zone and the prep/serving zone, which keeps guests away from the grill without forcing them off the deck.
Island or U-shape: A freestanding or three-sided setup that works on larger decks (16x20 and up). The island creates a social focal point and allows seating on the non-cooking side, but it demands careful traffic planning — you need at least 42 inches of clear walkway on every open side.
A few design details that consistently show up in well-executed deck kitchens:
Covered vs. open: A pergola or retractable awning over the cooking zone protects appliances, extends the season, and creates a defined room feel. Deck cover options like pergolas also help manage smoke direction on covered installations. Just confirm ventilation clearances before enclosing the space.
Counter-to-railing relationship: Countertops that run parallel to the railing look intentional and create a natural bar-height seating opportunity. Perpendicular runs can feel awkward and block sightlines.
Integrated seating: Built-in bench seating at the end caps of an L-shape or island keeps guests in the conversation without crowding the cook.
Lighting: Recessed under-cabinet lighting and post-cap lights make the space usable after dark and photograph well for project galleries.
Pro Tip: Orient the grill so the cook faces the gathering, not the house wall. It sounds obvious, but most people default to pushing the grill against the back wall and end up cooking with their back to everyone. Flip it, and the whole dynamic changes.
Is your deck strong enough? A load-capacity checklist
This is the section most homeowners skip, and it’s the one that causes the most expensive problems. Outdoor kitchens concentrate heavy loads in small areas. A 6-foot run of concrete countertop can weigh 800–1,200 lbs. A built-in grill with its housing adds another 200–400 lbs. Stack those on a 10-year-old deck with undersized joists and you have a serious problem.
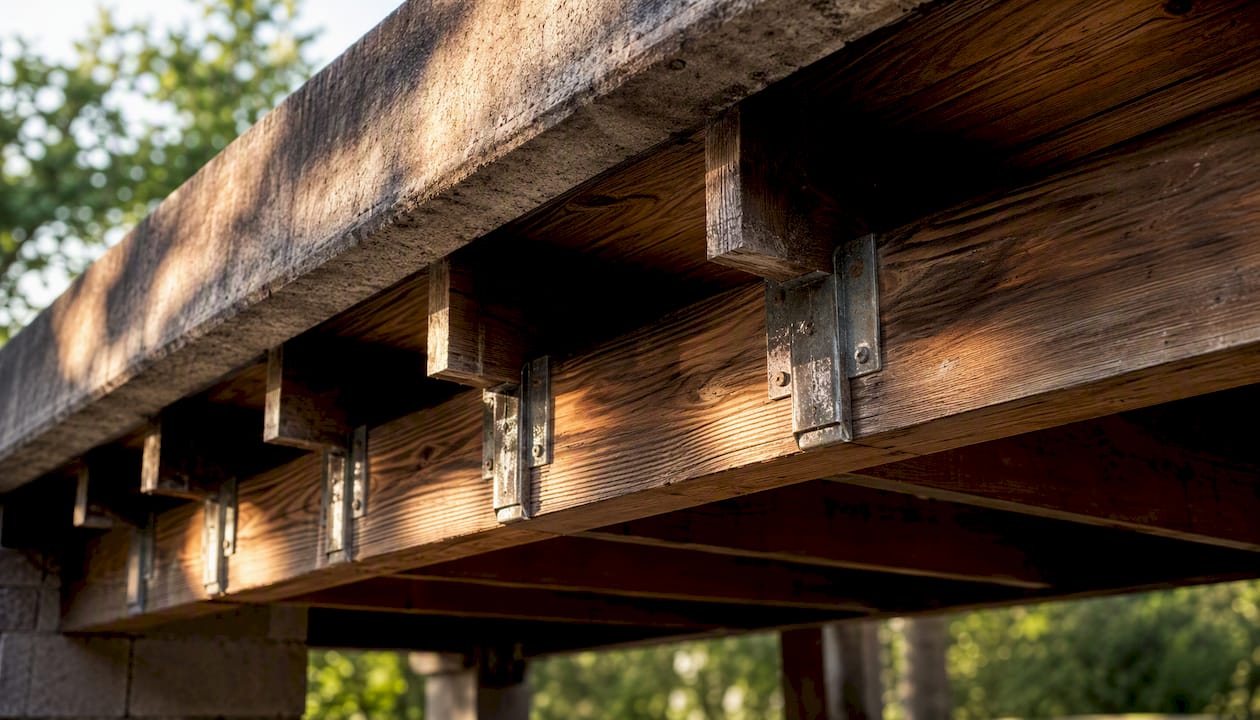
Deckorators’ experts recommend verifying both heat and weight capacity before committing to any built-in appliance, and suggest lighter framing and composite decking as ways to reduce structural demands without sacrificing durability.
Homeowner inspection checklist — do this before calling a pro:
Footings: Are they visible and intact? Any cracking, heaving, or settlement?
Posts: Check for rot at the base, especially where posts contact the ground or a concrete pad.
Joists: Look underneath the deck. Are they the right size for the span? Any sagging, splitting, or rot?
Post spacing: Wider spacing (over 8 feet) between posts reduces load capacity significantly.
Ledger board: Where the deck attaches to the house. This is a common failure point. Look for proper flashing, no rot, and solid fastening.
Visible deflection: Any bounce or flex when you walk the area where the kitchen will sit? That’s a red flag.
If you find any of the above issues, stop and call a structural engineer or a licensed deck contractor before proceeding.
Reinforcement options when the deck needs help:
Sister the joists: Add new joists alongside existing ones to increase load capacity without replacing the whole frame.
Add posts and footings: Drop new support posts under the kitchen zone, tied to new concrete footings below the frost line.
Relocate heavy items: Move stone countertops or masonry to ground level and use lighter materials (stainless steel, porcelain slab) on the deck.
Switch to composite decking: Composite and engineered framing reduce dead load compared with heavy masonry, making a kitchen feasible without major structural overhaul.
A structural engineer is the right call when you have visible deflection, unknown footing depth, or a ledger in questionable condition. A qualified deck contractor can handle reinforcement when the structure is sound but needs targeted upgrades.
What a professional deck-readiness inspection actually covers
Hiring a pro isn’t just about getting a signature on a permit. A thorough inspection gives you a prioritized repair list, a realistic cost range, and a timeline before you’ve spent a dollar on appliances.
Here’s the sequence a professional walkthrough typically follows:
Site visit and visual survey: The contractor walks the deck, checks for visible rot, deflection, and connection issues, and photographs the current condition.
Load calculation: Using your deck’s dimensions, joist size, and span, the contractor calculates the existing capacity and compares it against the planned kitchen’s estimated weight.
Ledger and connection inspection: The ledger-to-house connection is checked for proper flashing, fastener type, and any signs of water infiltration or rot.
Footing and soil assessment: Post bases and footings are inspected for settlement, frost heave, or inadequate depth.
Reinforcement plan: If the deck needs work, the contractor outlines options (sistered joists, new posts, relocated loads) with rough cost ranges and a timeline.
Report and next steps: You receive a prioritized list of fixes, a rough cost estimate, and a clear go/no-go recommendation for the kitchen build.
Pro Tip: Before the site visit, measure the deck and sketch a rough layout of where you want the kitchen. Bring photos of appliances you’re considering and note their weights from the spec sheets. A contractor who can see your actual wish list gives you a much more useful assessment than one working from a vague description.
Cactusdecking’s consultation process covers all of these steps, including photo documentation, reinforcement options, and warranty-backed installation planning. Typical project timelines from initial consultation to completed build run several weeks to a few months depending on permit processing times and the scope of structural work.
Which materials hold up best for a deck-mounted outdoor kitchen?
Material choices affect weight, maintenance, fire safety, and how long the kitchen actually lasts. Get this wrong and you’re either overloading the deck or replacing cabinets in three years.
Decking surface under the kitchen:
Composite (Trex, Fiberon): The most practical choice for most deck kitchens. Both brands offer slip-resistant surfaces, good heat tolerance, and significantly lower weight than masonry. Composite decking lifespan typically runs 25–30 years with minimal maintenance. For a comparison of the two, composite vs. PVC decking covers the tradeoffs in detail.
PVC decking: Slightly lighter than composite and fully waterproof, which matters under a sink or refrigerator. Less natural-looking but very low maintenance.
Pressure-treated or cedar: Lower upfront cost, but requires more maintenance near heat sources and moisture. Not ideal directly under a grill or sink.
Countertops:
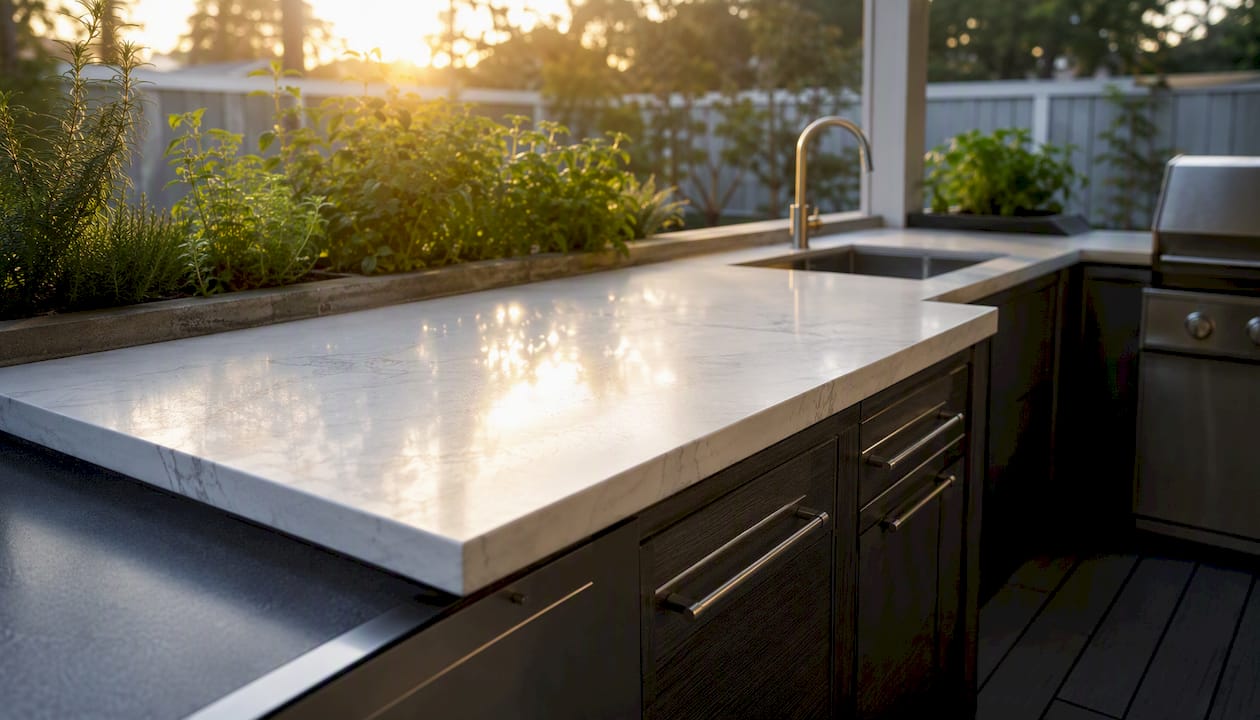
Porcelain slab: Light (roughly 3–4 lbs per square foot at 3/4-inch thickness), heat-resistant, and nearly maintenance-free. The best weight-to-performance ratio for deck applications.
Stainless steel: Extremely durable, non-combustible, and easy to clean. Heavier than porcelain but lighter than concrete. The professional choice for grill surrounds.
Engineered stone (quartz): Heavier than porcelain but very durable. Confirm your deck can handle the load before specifying it.
Concrete: Beautiful but heavy — typically 18–20 lbs per square foot. Requires significant structural support and is best reserved for ground-level installations.
Cabinetry and doors:
Marine-grade polymer: The top choice for outdoor cabinetry. Waterproof, UV-stable, and unaffected by humidity. No painting, no swelling.
Stainless steel cabinets: Commercial-grade durability. Heavy, but extremely long-lasting and non-combustible.
Raw wood: Avoid near grills or sinks without heavy sealing and regular maintenance. Even treated wood degrades faster in a cooking environment.
Grill surround framing:
Home Depot’s build sequence shows the standard approach: frame with metal studs, add cement board as a substrate, apply a fire barrier or sealant, and finish with stainless flashing or stone veneer. This keeps combustible materials away from the grill’s heat output.
Pro Tip: Porcelain slab countertops are the single best upgrade most homeowners don’t consider. They weigh a fraction of concrete, handle heat without sealing, and look just as good. If your deck is borderline on load capacity, switching from concrete to porcelain can make the difference between reinforcing and not.
Grill and fire safety: what you need to know before you cook
Clearances are the most commonly misunderstood part of a deck kitchen. Meeting the minimum code distance from the house doesn’t mean you’ve addressed heat damage to the deck itself. Fine Homebuilding recommends insulating grill jackets and non-combustible framing specifically because long-term heat transfer from high-BTU grills degrades decking and joist materials even when minimum clearances are met.
Clearance checklist (verify against local code and your grill manufacturer’s instructions):
Distance from the house wall and any combustible siding
Distance from overhead structures (eaves, pergola beams, awning fabric)
Distance from deck railings, especially composite or wood railings
Clearance above the grill for smoke and heat dissipation
Distance from any gas meter, electrical panel, or utility line
Grill manufacturers publish specific clearance requirements in their installation manuals. Those numbers are the floor, not the ceiling. Local fire codes and HOA rules may require more.
Heat management tactics that actually work:
Insulated grill jackets: Wrap the grill housing in an insulated liner to contain radiant heat and protect adjacent cabinetry and decking.
Non-combustible framing: Use metal studs and cement board around the grill, not wood framing.
Heat-resistant mats: Place a non-combustible mat under the grill area to protect the decking surface from grease and radiant heat.
Masonry or metal barriers: A short masonry knee wall or stainless panel between the grill and adjacent combustibles adds meaningful protection.
Pro Tip: For deck installations where clearance is tight, gas or electric grills are the practical choice. Charcoal and offset smokers produce more radiant heat, more ash, and more unpredictable smoke direction — all of which create additional risk on a wood or composite deck. Save the smoker for the patio.
Running gas, electrical, and plumbing to your deck kitchen
Every utility connection to an outdoor kitchen is a potential permit trigger. Plan this before you finalize the layout, because utility routing affects where the kitchen can physically go.
Gas:
Natural gas lines require a licensed plumber or gas fitter and a permit in virtually every U.S. jurisdiction. The line must be properly sized for BTU demand and tested for leaks before use.
Propane is more flexible for routing but requires proper tank placement (typically outside the deck perimeter, away from heat sources) and a regulator sized for your appliances.
Install a dedicated shutoff valve accessible from outside the kitchen structure.
Electrical:
Outdoor receptacles must be GFCI-protected and weatherproof-rated (in-use covers at minimum).
Refrigerators and other major appliances typically need a dedicated 20-amp circuit. Running multiple appliances off a single circuit is a code violation and a fire risk.
All electrical work on a deck kitchen requires a permit and inspection in most jurisdictions. Hire a licensed electrician.
Plumbing:
Route sink drains to a proper plumbing connection, not under the deck. Deckorators’ guidance and practical planning resources both emphasize that open drainage under a deck creates moisture, rot, and pest problems.
In cold climates, install accessible shutoffs and drain valves so you can winterize the lines before freezing temperatures arrive.
Insulate any exposed supply lines against freezing.
Ventilation:
On an open deck, natural airflow usually handles smoke adequately if clearances are correct.
On a covered deck or under a pergola with a solid roof, a vent hood over the grill is strongly recommended. Smoke that can’t escape will stain overhead structures and drift into the house through nearby windows and doors.
Pro Tip: Map all three utility routes on paper before breaking ground. Gas, electrical, and plumbing often need to share a chase or penetrate the same deck framing, and conflicts are much easier to resolve on paper than mid-construction.
Protecting your deck from water and grease damage
Adding a sink and appliances to a deck creates new moisture pathways that the original structure wasn’t designed for. Grease, standing water, and frozen supply lines are the three most common causes of premature deck failure under an outdoor kitchen.
Common failure modes to prevent:
Trapped moisture under cabinets that sit flat on the decking surface
Grease infiltrating deck boards and joists, accelerating rot
Frozen supply lines that burst and flood the substructure
Standing water around the sink area from inadequate drainage slope
Practical fixes:
Install a waterproof membrane under the cabinet base and around any penetrations in the decking.
Slope the area around the sink slightly toward a drain routed to proper plumbing. Even a 1/8-inch-per-foot slope makes a meaningful difference.
Use drip pans under the refrigerator and any appliance with a condensate line.
Raise cabinet bases slightly off the decking surface to allow airflow and prevent moisture trapping.
Annual maintenance checklist:
Inspect waterproof membrane seals around all penetrations.
Clean grease from the deck surface and under the grill area.
Flush and drain all water lines before the first hard freeze.
Check for soft spots or discoloration in the decking under and around the kitchen.
Pro Tip: Build in a service panel on the back or side of the kitchen structure. A removable panel gives you access to plumbing shutoffs, electrical connections, and the underside of the countertop without tearing apart the whole build. It costs almost nothing to add during construction and saves hours of work later.
Circulation and clearance: how much space does a deck kitchen need?
The most common planning mistake is choosing appliances before confirming that doors, lids, and people can all move at the same time. A kitchen that looks great in a rendering can be genuinely frustrating to cook in if the grill lid opens into the walkway or the refrigerator door blocks the prep counter.
Minimum dimensions to plan around:
Primary walkway: 42 inches clear minimum between the kitchen and any fixed structure (railing, wall, furniture). 48 inches if two people will regularly pass each other.
Grill lid clearance: Most built-in grill lids swing back 90 degrees or more. Measure the open lid’s height and confirm it clears any overhead structure by at least 12 inches.
Appliance door swing: Refrigerator and drawer doors need full clearance to open without hitting adjacent cabinets or the cook.
Prep counter depth: 24 inches is the functional minimum. Less than that and you’re constantly moving things to find workspace.
Bar overhang for seating: 12–15 inches of overhang with 28–30 inches of knee clearance below for bar stools.
Layout validation checklist before construction:
Mark the kitchen footprint on the deck with tape and walk through it with the grill lid “open” (use a cardboard stand-in).
Confirm the primary traffic path from the house door to the seating area doesn’t cross the cooking zone.
Check that the refrigerator door and grill lid can open simultaneously without conflict.
Verify the prep counter is adjacent to the grill, not across the kitchen from it.
Confirm seating doesn’t block the cook’s exit path in an emergency.
What does an outdoor kitchen on a deck actually cost?
Budget ranges vary widely depending on materials, structural work, and appliance choices. Here’s a realistic breakdown by project tier:
Simple/portable setup ($1,500–$5,000): A freestanding grill, a portable prep cart, and a small outdoor refrigerator. No structural reinforcement, no utility work beyond a standard outlet. This is the right starting point if your deck’s load capacity is uncertain or you want to test the layout before committing.
Mid-range built-in ($10,000–$25,000): A built-in grill, 6–10 feet of countertop (porcelain or stainless), polymer cabinetry, a refrigerator, and a side burner. Includes gas line extension, one or two dedicated electrical circuits, and basic structural reinforcement if needed. Most homeowners in this range also add a pergola or shade structure.
High-end built-in ($30,000–$60,000+): Full outdoor kitchen with multiple appliances (grill, smoker, pizza oven, refrigerator, sink, ice maker), stone or engineered countertops, custom cabinetry, full utility rough-in, structural reinforcement, and a covered structure. Composite decking costs for the deck surface itself add to this total if the deck is being replaced or upgraded as part of the project.
Where costs concentrate:
Structural reinforcement (new footings, sistered joists): $2,000–$8,000
Countertop material (concrete and engineered stone cost significantly more than porcelain or stainless)
Gas line extension and permitting: $500–$2,500
Electrical (dedicated circuits, weatherproof outlets): $800–$3,000
Labor for cabinetry and finish work
Project phases and realistic timelines:
Design and permits: 2–6 weeks depending on jurisdiction backlog
Structural reinforcement: 1–3 days for most residential projects
Framing and countertops: 3–7 days
Utility rough-in (gas, electrical, plumbing): 1–3 days per trade
Finish work and appliance installation: 2–5 days
Cost-saving moves: Modular polymer cabinetry costs less than custom stainless. Porcelain countertops cost less than concrete and weigh less. A phased approach — start with the grill station, add the sink and refrigerator later — spreads cost without compromising the final result.
When should you hire a licensed contractor?
DIY is fine for portable setups and minor cosmetic work. The moment you touch structure, gas, or electrical, you need licensed trades. Here’s the clear line:
Hire a licensed contractor or structural engineer when:
The deck shows any visible deflection, rot, or unknown footing condition
The kitchen requires gas line extension or new gas connections
Electrical work involves new circuits, panel upgrades, or anything beyond plugging into an existing GFCI outlet
The installation includes a roof, pergola, or any overhead structure
Structural reinforcement (new posts, footings, sistered joists) is needed
The project requires permits (which most built-in kitchens do)
Questions to ask every contractor before signing:
Are you licensed and insured in Washington State (or your jurisdiction)?
Have you built deck-mounted outdoor kitchens before? Can I see examples?
Will you handle permitting, or is that my responsibility?
What does your written scope of work include?
What warranty do you offer on structural work and installation?
Who are your subcontractors for gas and electrical, and are they licensed?
Red flags that should end the conversation:
Vague scope with no written contract
“We don’t need a permit for this”
Unusually low bid with no explanation
No references or examples of similar work
Reluctance to pull permits or provide proof of insurance
Reputable contractors, including Cactusdecking, handle permit applications, provide documented structural calculations, and back their work with written warranties. That paper trail protects you if something goes wrong and is required by most homeowner insurance policies for structural modifications.
Why decks are actually the best place for an outdoor kitchen
Most outdoor kitchen content focuses on patios, and that’s a mistake. Decks have real advantages that patios don’t: they’re already connected to the house, which means shorter utility runs, easier access to the kitchen for supplies, and a natural flow from indoor to outdoor entertaining. You’re not crossing a yard to get to the grill — you step out the back door.
The homeowners I see get the most out of their deck kitchens share a few priorities. They want to stay part of the gathering while they cook, which means the grill faces the seating, not the wall. They want low maintenance, which means composite decking, polymer cabinets, and porcelain countertops rather than materials that need annual sealing. And they want the space to feel finished, not like a grill bolted to a deck.
The tradeoff is real: a deck imposes structural constraints that a concrete patio doesn’t. You can’t just set a 500-lb stone island anywhere you want. But that constraint is manageable with the right materials and a proper structural assessment upfront. The homeowners who skip that step are the ones who end up with a beautiful kitchen sitting on a deck that needs $8,000 in reinforcement after the fact.
My honest advice: start with the structure, not the appliances. Pick your grill last, after you know what the deck can carry and where the gas line can go. The layout follows the structure; the appliances follow the layout.
Cactusdecking builds deck kitchens that are ready for the long haul
A deck kitchen is only as good as the deck it sits on. Cactusdecking’s team in Everett, Washington, starts every outdoor kitchen project with a structural readiness check before a single appliance is specified. The consultation covers load capacity, reinforcement options, permit requirements, and a design walkthrough so you know exactly what the project involves before committing to a budget.
Cactusdecking uses composite and PVC decking from proven manufacturers, handles all permitting in-house, and backs every installation with a written warranty. Whether you’re starting from a new custom deck installation or adding a kitchen to an existing structure, the process is the same: assess, plan, build, and document. No vague scopes, no permit surprises.
Ready to see what your deck can support? Schedule a deck design consultation and get a clear picture of what your outdoor kitchen project actually requires.
Sources
These resources cover the technical, design, and code details that go beyond what any single article can address. Check your local building department’s website for jurisdiction-specific permit requirements before starting any utility or structural work.