Cedar Deck Maintenance: How to Keep the Color and Add Years
Discover essential tips for cedar deck maintenance to preserve its rich color and extend its lifespan. Start with these easy three steps!

Cedar Deck Maintenance: How to Keep the Color and Add Years
Seal or stain your cedar deck within a year of installation and plan to recoat routinely every few years. Left bare, cedar still holds up structurally, but it will gray out and lose the warm tone that made you choose it in the first place. Here’s the three-step move you can start this weekend:
Clean it. Wash with an oxygen-based cleaner and a garden hose, not a pressure washer set to full blast.
Inspect and repair. Check for loose fasteners, soft spots, and gray boards before you touch a brush.
Seal or stain if you want to keep the color. Skip it only if you’re fine watching cedar fade to silver gray.
Pro Tip: The single biggest mistake homeowners make is grabbing chlorine bleach and a pressure washer set way too high. Both strip cedar’s natural oils and fuzz the surface, which actually speeds up decay instead of preventing it.
Key Takeaways
Cedar decks last decades with routine cleaning and a recoat every one to three years, but skipping proper cleaning chemistry or pressure limits shortens that lifespan fast.
Point | Details |
|---|---|
Clean gently | Use oxygen-based or biodegradable cleaners, never chlorine bleach, and keep pressure washers under 1,200 PSI. |
Prep before staining | Clean, brighten, and let wood dry 48 to 72 hours before applying any finish. |
Match finish to goals | Semi-transparent stain balances grain visibility with UV protection; oil-based formulas last longer between coats. |
Stay on schedule | Recoat every 1 to 3 years and inspect fasteners and boards monthly during heavy-use seasons. |
Call in help when needed | Cactusdecking’s crew handles inspections, repairs, and full refinishing with warranty-backed work. |
Table of Contents
How do you prep a cedar deck before cleaning or staining?
What’s the safest way to clean a cedar deck?
Which finish is right for your cedar deck?
What ongoing maintenance keeps a cedar deck in good shape?
When should you call a deck contractor instead of DIYing?
Sources
How do you prep a cedar deck before cleaning or staining?
Good prep is what separates a stain job that lasts three years from one that peels in six months. Skipping this step is the number one reason DIY refinishing jobs fail.
Start with the basics:
Clear off furniture, planters, and grills.
Sweep away leaves, dirt, and debris caught between boards.
Move nearby plants or cover them, since cleaning runoff can be tough on landscaping.
Inspect the whole surface for soft or rotted wood and loose fasteners.
Most repairs here are manageable yourself. Tightening a popped screw or swapping a single warped board is a weekend job. If you find rot spreading into the joists or posts underneath, that’s your cue to stop and call a professional before you refinish anything on top of a compromised structure.
Gray, weathered boards need a decision. Light graying usually responds well to cleaning and a wood brightener, which neutralizes the wood’s pH and helps stain bond properly. Heavier weathering may call for light sanding, but go easy. Cedar is soft, and aggressive sanding removes more wood than you’d expect and can leave uneven patches once stain goes on.
Pro Tip: New cedar boards often carry a factory sheen called mill glaze that blocks stain absorption. Let new lumber weather for four to eight weeks before staining, and always let cleaned wood dry fully, generally 48 to 72 hours, before applying anything.
What’s the safest way to clean a cedar deck?
Cedar is porous and soft, so what works fine on pressure-treated pine can wreck it. The right chemistry matters more than elbow grease here.
Oxygen-based cleaners (sodium percarbonate) lift dirt and mildew without breaking down cedar’s natural oils.
Biodegradable deck cleaners are gentler on nearby plants and grass during rinse-off.
Wood brighteners like oxalic acid restore the wood’s natural tone and reset pH after cleaning, which is essential before staining.
Avoid chlorine bleach entirely. Contractors consistently warn it strips cedar’s natural oils and accelerates graying, the opposite of what you’re trying to prevent. Skip stiff wire brushes too, and never scrub against the grain.
If you use a pressure washer, keep it at 1,000 to 1,200 PSI and hold the wand at a shallow angle. A garden hose and a soft-bristle brush do the job just as well on most decks and carry zero risk of gouging the surface. Pre-wet nearby plants before applying any cleaner, and rinse thoroughly so runoff doesn’t pool and damage grass or garden beds.
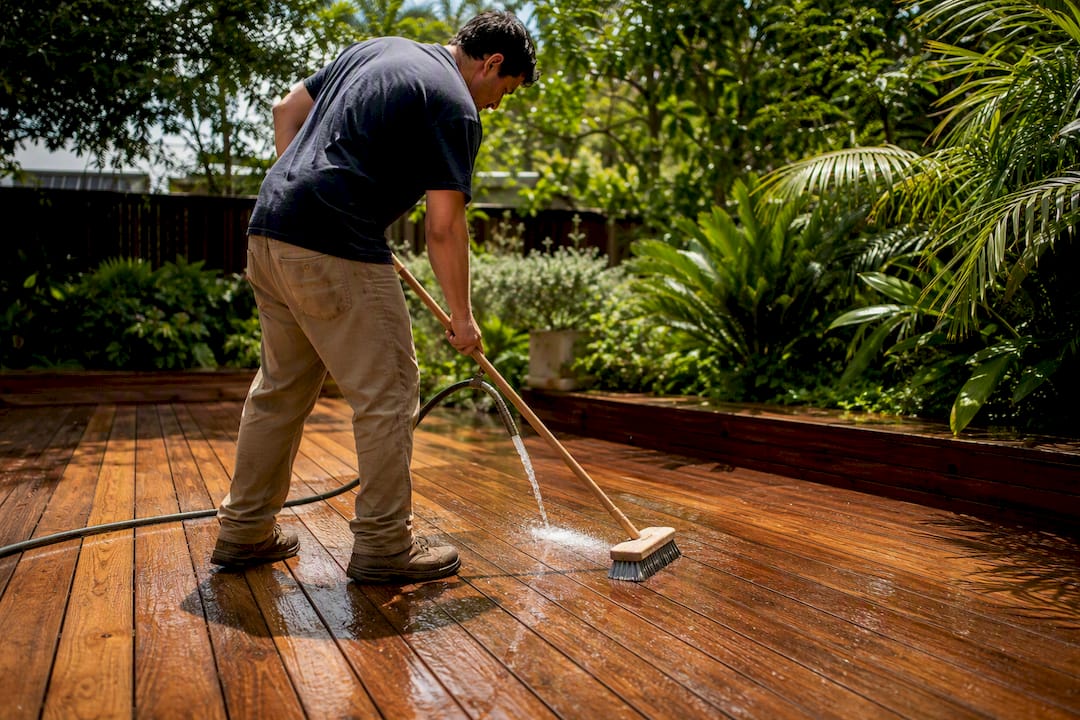
Pro Tip: If the wood surface feels fuzzy or raised after washing, you pushed too hard with pressure or a brush. A light sanding pass will smooth it back out before you stain.
Which finish is right for your cedar deck?
This is where most homeowners get stuck, and the choice affects how often you’ll be back out here with a brush.
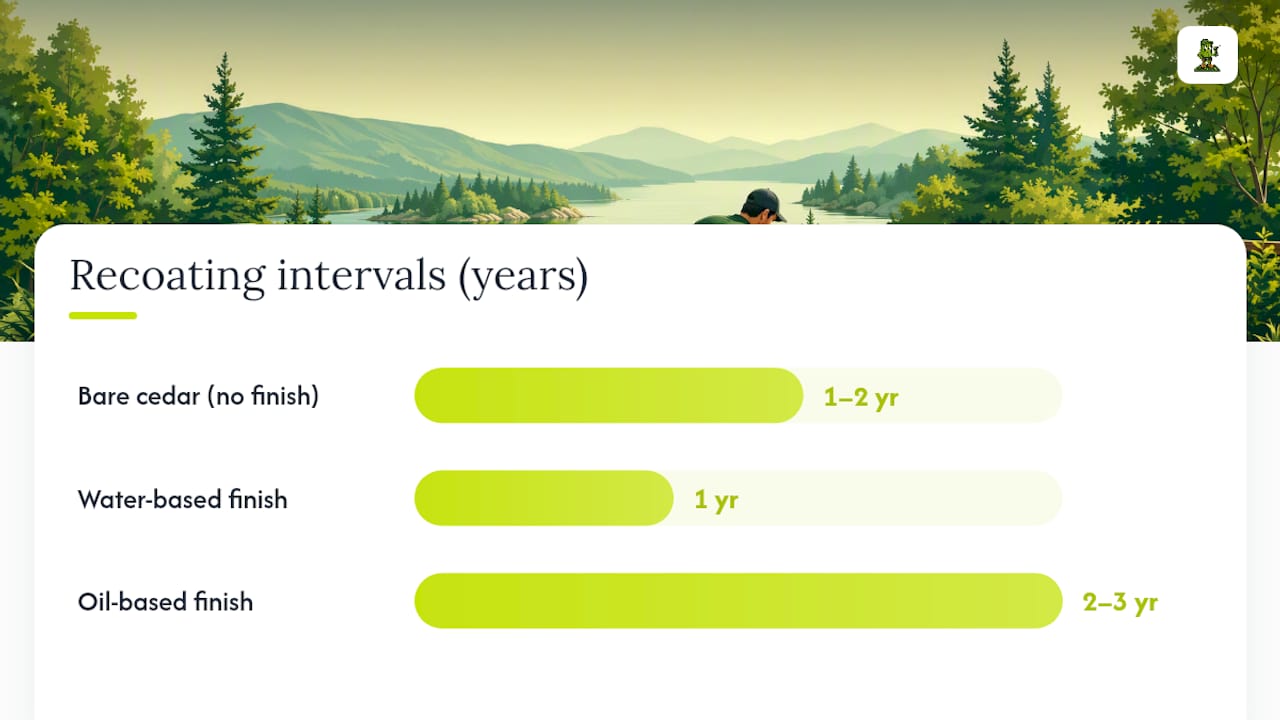
No finish: Cedar naturally resists rot and insects, so bare wood survives fine structurally. It will gray within a year or two.
Transparent stain: Shows the most grain, but offers the least UV protection and needs recoating most often.
Semi-transparent stain: The most common choice for cedar. Balances color retention with visible wood grain.
Solid stain: Best UV and moisture protection, but hides the grain entirely and looks more like paint.
Oil-based formulas: Penetrate deeper and typically last two to three years between coats.
Water-based formulas: Easier cleanup and lower odor, but usually need reapplication annually.
If you want to keep that honey-brown cedar color, sealing isn’t optional. Skip it, and the deck will still function for decades, but it fades to gray within a season or two of sun exposure.
Once you’ve picked a product, application technique determines whether it looks professional or patchy:
Test a small hidden area first to confirm color and drying behavior.
Confirm the wood is clean and fully dry, generally after that 48 to 72 hour window.
Apply with a brush or roller for control, or a sprayer for large surfaces followed immediately by backbrushing.
Pay extra attention to end grain, which absorbs stain fast and unevenly if rushed.
Work in manageable sections and maintain a wet edge to avoid visible lap marks.
Timing matters as much as technique. Pros favor warm, overcast days over hot, direct sun, since staining in full sun on a scorching afternoon causes uneven absorption and blistering. A simple water-drop test tells you if the wood is dry enough: if water beads up instead of soaking in, hold off another day.
Pro Tip: Recoat before the old finish fully wears away, not after. Waiting until bare wood shows through means you’re refinishing weathered cedar instead of maintaining a protected surface, and that’s a bigger job every time.
What ongoing maintenance keeps a cedar deck in good shape?
Small, consistent effort beats occasional deep cleans. Build these into your yearly rhythm and you’ll rarely face a major restoration project.
Spring: Do your annual deep clean once temperatures stabilize, ahead of heavy outdoor use.
Summer: Walk the deck monthly, checking for loose boards, popped fasteners, and early signs of mildew.
Fall: Clear leaves and debris regularly so moisture doesn’t sit trapped against the wood.
Winter: Keep snow from piling against railings and clear standing ice where it collects.
Sweep debris out from between boards often since trapped moisture and organic matter are what actually invite rot and mildew, not the wood itself. Keep gaps between boards clear, skip solid skirting that blocks airflow underneath, and confirm your deck slopes away from the house so water drains instead of pooling. A quick clean handles most upkeep. If you’re seeing widespread graying, soft boards, or finish that’s peeled rather than faded, you’re past cleaning and into restoration territory.
When should you call a deck contractor instead of DIYing?
Some problems are worth handing off. Structural rot in joists or posts, widespread fastener failure, or boards that flex underfoot are signs the deck needs more than a weekend of your time.
A contractor brings tools and access most homeowners don’t have: commercial-grade strippers for heavy restoration, controlled sanding equipment that won’t gouge soft cedar, professional sprayers for even coverage, and moisture meters to confirm wood is actually dry enough to finish.
Before hiring, ask about:
Warranty coverage on labor and materials
Whether they pull permits for structural repairs
Timeline and how weather delays are handled
Local references and completed cedar projects
A practical note before you grab the hose
Regular, unglamorous maintenance beats any emergency fix. Clean and inspect on schedule, and your cedar deck will reward you for decades.
Need a hand? Here’s what a professional inspection covers
Not every homeowner wants to spend a Saturday sanding and testing stain colors, and that’s a fair call. Cactusdecking’s in-house crew handles everything from a single rotted board to a full strip-and-refinish, backed by warranty coverage so you’re not guessing whether the work will hold up.

If you’re weighing repair against a bigger project, a quick consultation clears that up fast. When you talk to a contractor, ask what materials they’ll use, how long the job takes start to finish, whether they’ve worked with cedar locally, and what warranty backs the labor. Cactusdecking’s deck design team walks through those questions during every consultation, whether you need a refinish, a partial rebuild, or you’re ready to explore a full upgrade. Reach out and get a straight answer on what your deck actually needs.
Sources
Keeping cedar stunning: Pro tips for caring for your deck | The Seattle Times
Cleaning Cedar, Redwood, and Pressure-Treated Decks: A Wood-by-Wood Guide - HempShields