$15–$60 per Board: Replace Deck Boards Without Rebuilding, Homeowners
Practical, homeowner-focused steps to replace damaged deck boards for $15–$60 a board. Inspect joists, match the finish, and know when to hire a pro.

$15–$60 per Board: Replace Deck Boards Without Rebuilding, Homeowners
Yes, in most cases you can replace one or more deck boards without rebuilding the whole structure. Replace boards when the damage is surface-only (rot, splinters, cracking) and the frame underneath is solid. The basic process is remove, inspect, fit and fasten, then finish to match. A single board runs a couple of hours and costs $15 to $60 in materials; larger jobs or hidden frame damage are where hiring a licensed contractor starts to make more financial sense than a weekend of DIY.
TL;DR:
Replacing individual deck boards is feasible when damage is limited to surface issues and the underlying frame remains solid.
Inspect underlying joists and ledger before replacing boards, since structural problems require professional repair or full deck rebuilds.
Material costs for replacement boards range from $15 to $60, with bigger projects and hidden frame damage making professional help more cost-effective.
Proper removal and precise installation of new boards, including support checks and gap adherence, are key to a seamless, durable repair.
DIY fixes are suitable for simple board swaps, but frames with compromised joists, rot, or permit-required structural work benefit from professional inspection and replacement.
CactusdeckingPlan A Safer, Longer-Lasting DeckCactus Decking creates tailored outdoor living spaces with durable material options and organized construction from consultation through completion.Explore deck services
Table of Contents
Should You Repair, Replace, or Resurface?
Tools and Materials You’ll Need
How Do You Remove a Damaged Deck Board?
How Do You Install a Replacement Deck Board?
Inspecting the Frame: Joists, Ledger, and Flashing
What Does It Cost to Replace Deck Boards?
Finishing the New Board to Match
When Should You Hire a Professional Instead?
Get a Professional Estimate for Deck Board Replacement or Resurfacing
Sources
Should You Repair, Replace, or Resurface?
The scope of the problem decides the scope of the fix. Pull out a screwdriver and poke around before you commit to a plan, because the difference between a one-board fix and a full rebuild often comes down to what’s happening underneath, not what you see on top.
Replacing individual boards makes sense when you’re dealing with:
Isolated rot on one or two boards while neighboring boards feel solid
Surface splinters or cupping that catches bare feet or snags clothing
A single cracked or split board, usually from a dropped grill or a heavy planter
You’re likely looking at frame work or a full rebuild if you find soft, spongy joists, a ledger board pulling away from the house, or noticeable bounce when you walk across a section. If the frame checks out but the surface looks tired across the board, resurfacing with composite or vinyl can save 25 to 40% compared with a full replacement, as you skip demolition and disposal costs entirely.
Tools and Materials You’ll Need
You don’t need a contractor’s trailer for this job, but a few specific tools make the difference between a clean repair and a frustrating afternoon.
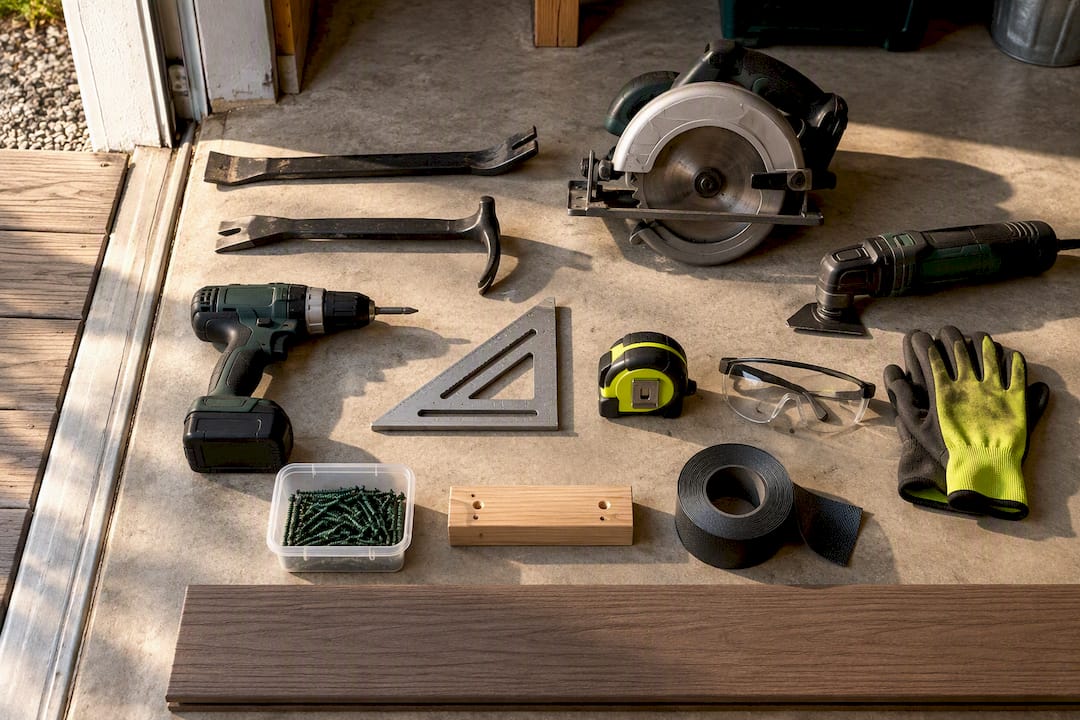
Tools: flat pry bar, cat’s paw, circular saw, oscillating multi-tool, drill/driver or impact driver, speed square, and a tape measure.
Fasteners and supports: stainless steel or coated deck screws (2.5 inches or longer), 12-inch cleats for splice support, and joist tape or flashing if the joist top shows exposed wood.
Materials and safety gear: replacement boards in pressure-treated, cedar, or composite to match your existing decking, stain or sealer for finishing, plus safety glasses and work gloves. Old deck screws hide rust and splinters, and a stray nail head has ended more than one DIY afternoon early.
How Do You Remove a Damaged Deck Board?
Start by identifying how the board is fastened. Screws pull cleanly with the right bit; nails and hidden or stripped fasteners need a different approach.
Inspect first. Mark the damaged board’s full length, check whether it’s screwed or nailed, and look underneath if you have crawl access.
Remove screws. Use an impact driver on the correct bit size. Paint-filled or stripped heads may need a screw extractor or a quick drill-out with a slightly larger bit.
Remove nails. Tap the board up from underneath if possible, then pry from the top using a piece of scrap wood under the bar to protect the neighboring boards. Pull remaining nails with a cat’s paw or cut the shanks flush with an oscillating tool.
Cut it out if fasteners won’t budge. Set a circular saw to the board’s thickness, cut two offset passes down the center, pull the narrow center strip free, then pry up the two remaining halves.
Clear the joist top. Pull or grind down any leftover fastener stubs before setting the new board.
Pro Tip: Side-prying under a stuck screw head, rather than lifting straight up, tears out far less surrounding wood grain. When you can reach the underside, that’s almost always the cleaner and faster route.
How Do You Install a Replacement Deck Board?
Fitting the new board right is what determines whether the repair blends in or sticks out like a patch job.
Measure and cut with a little extra. Cut slightly long rather than exact. New pressure-treated boards are sold wet and shrink in width as they dry, so a snug fit today can gap later. If you need matching stain, pre-finish the board before it goes in.
Confirm support underneath. The board needs to bear on at least three joists, or you’ll need a cleat. If an end lands between joists, fasten a 12 inch cleat tight to the underside of the adjacent board so there’s no visible gap.
Set fasteners correctly. Drill pilot holes near the ends to prevent splitting, and use two screws per joist. Match the screw head style to your board material, composite generally wants trim-head or specialty composite screws.
Check gaps and flatness. Leave consistent edge and end gaps, matching manufacturer spacing specs if you’re using composite. Countersink or trim high spots so the new board sits flush with its neighbors.
Inspecting the Frame: Joists, Ledger, and Flashing
Before you fasten anything back down, spend five minutes with a screwdriver checking what’s underneath. This is the step DIYers skip most often, and it’s the one that determines whether your repair actually holds.
Press a screwdriver into the joist top where the old board sat. If it sinks in easily or feels spongy, that wood is compromised and needs sistering or replacement, not just a new board on top.
Walk the deck and note any bounce or sag between joists, which points to undersized or failing framing.
Check where the deck meets the house. A loose or separated ledger board, or missing/damaged flashing above it, is a serious structural red flag, not a cosmetic one.
Call a licensed contractor if you find rot spreading across more than a couple of joists, ledger separation, shifted footings, or visible structural movement anywhere in the frame.
What Does It Cost to Replace Deck Boards?
Material costs scale with the wood you choose. A pressure-treated 5/4x6 board runs cheapest, cedar costs noticeably more per board, and composite sits highest upfront but skips future staining. Homeowners typically budget the board itself plus screws and a quart of sealer as one line item per board replaced.
Time estimates:
A single board: 1 to 3 hours start to finish
A small patch (multiple boards, one area): half a day to a full day
Resurfacing or replacing many boards: multiple days, especially with composite spacing requirements
Resurfacing with composite instead of rebuilding can cut costs by 25 to 40% compared with a full deck replacement, but only when the existing frame is sound enough to build on.
Hiring a pro tends to pay off once you’re dealing with hidden frame damage, permit-required structural work, or a resurfacing job spanning the whole deck. At that scale, labor efficiency and warranty coverage usually offset the higher hourly rate.
Finishing the New Board to Match
A perfectly installed board still looks wrong if it doesn’t match the finish around it. Sand off the mill glaze on new pressure-treated or cedar boards before staining, since raw lumber won’t absorb sealer evenly otherwise.
Match the stain or sealer tone to your existing deck, and test on a scrap piece first
Use painter’s tape to protect the boards next to your repair when spot-finishing
Apply stain or sealer in dry weather with moderate temperatures, and skip it if rain is forecast within 24 hours
If the new board’s color still stands out after a season, refinishing the whole deck surface evens things out
Wood decking also holds up best for slip resistance in wet and dry conditions compared with some composite and plastic products, worth factoring in you’re choosing a replacement material for a pool deck or shaded area. Annual cleaning and resealing every 2 to 3 years keeps wood decking from sliding back into the condition that got you here in the first place.
When Should You Hire a Professional Instead?
Most single-board swaps are well within reach for a homeowner with a Saturday afternoon and the right tools. Where it stops being a DIY project is ledger repair, multiple compromised joists, or a resurfacing job that touches permit-regulated structural elements. Cactus Decking’s in-house crews handle exactly that gap, full deck replacement work backed by warranty, using composite, PVC, or cedar depending on your climate and budget. If a five-minute inspection turns into a frame conversation, that’s the signal to bring in a professional set of eyes rather than keep pulling boards.
— Vlad
Get a Professional Estimate for Deck Board Replacement or Resurfacing
Cactus Decking gives you something a solo weekend project can’t: an in-house crew that inspects the whole frame before touching a single board, so you’re not guessing whether that “quick fix” is hiding rotten joists underneath. That matters most on jobs where a DIY board swap turns into discovering the ledger’s compromised, or where resurfacing the whole deck makes more sense than patching board by board.
A consult starts with a full inspection, not a sales pitch, followed by a written estimate that lays out your scope options: patch the boards, resurface the deck, or go with a full replacement if the frame calls for it. Every installation comes backed by warranty and built by an in-house crew, not subcontractors. If you’re staring at a soft board and wondering whether it’s a Saturday project or a bigger issue, request a deck replacement estimate and get a straight answer before you pull up a single fastener.
Sources
FAQ
Can You Just Replace Boards on a Deck?
Yes, as long as the frame underneath, the joists, ledger, and flashing, is structurally sound. If those parts check out, swapping individual boards is a straightforward repair rather than a full rebuild.
What Is the Average Cost to Replace Deck Boards?
A single board typically runs $15 to $60 in materials depending on whether you choose pressure-treated, cedar, or composite, plus an hour or two of labor if you’re doing it yourself. Larger jobs involving multiple boards or hiring a contractor cost more, and Cactus Decking provides project-specific estimates after an on-site inspection.
What Is the Cheapest Way to Replace Deck Boards?
Pressure-treated lumber is the least expensive replacement material per board, and doing the work yourself with basic hand tools keeps labor costs at zero. If the frame is sound and multiple boards need attention, resurfacing instead of a full rebuild is often the more economical route.
What Type of Wood Is Best for Replacing Deck Boards?
Cedar and pressure-treated lumber are the most common choices, with cedar offering better natural rot resistance and a warmer look at a higher price point. For slip resistance in wet conditions, wood decking outperforms many composite and plastic alternatives, which matters most in shaded or high-moisture areas.